This is the 2nd post in the “Unity Editor Extension” series.
The post describes the basics steps for creating custom inspectors in the Unity editor. In the next posts of the series i will dive into more advanced topics such as working with inspectors along with Unity’s serialization system.
Inspector Basics
 The inspector is one of the mostly used windows in the Unity editor – a single view that displays all the relevant information for a game object and allows manipulating it easily.
By default, the inspector allows editing everything that can be serialized, according to these rules (see this post):
- Public, or marked with [SerializeField]
- Not static
- Not const, readonly
- Field of a type that can be serialized
You may ask yourself what fields can be serialized (I recommend having a read of the blog post linked above):
- Custom non abstract classes with [Serializable] attribute.
- Custom structs with [Serializable] attribute. (new in Unity4.5)
- Objects that derive from UntiyEngine.Object
- Primitive data types (int, float, double, bool, string, etc)
- Arrays of a type that can be serialized
- List<T> of a type that can be serialized
Creating a Custom Inspector
Unity allows creating a custom inspector for your custom defined classes. This can be done for a variety of reasons, for example: customizing the looks of the inspector or automating a certain behaviour (do something whenever a field’s value changes).
To create a new inspector, you first create a new editor class (code file placed in an Editor folder) and derive it from the Editor class. This class should also be decorated with the CustomEditor attribute, in order to let the engine know which type the editor is used for:
[CustomEditor(typeof(MySettingsClass))]
public class MySettingsEditor : Editor
{
public override void OnInspectorGUI()
{
// This is where the magic happens.
}
}
The overriden method OnInspectorGUI is the one providing the GUI code for displaying the inspector’s contents. This post does not deal with the creation of GUI elements and how to style the new inspector – these topics are planned to be covered in a future post.
Displaying the Default Inspector
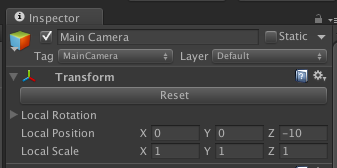
Sometimes you may want to keep the looks of the original inspector while only adding minor changes to it. This can be done using the DrawDefaultInspector method. For example, consider adding a “Reset” button to the Transform component:
[CustomEditor(typeof(Transform))]
public class TransformEditor : Editor
{
public override void OnInspectorGUI()
{
if (GUILayout.Button("Reset"))
{
var transform = target as Transform;

transform.position = Vector3.zero;
transform.localScale = Vector3.zero;
transform.rotation = Quaternion.identity;
}

// This draws the default inspector for MySettingsClass
DrawDefaultInspector();
}
}
 The result of the code above can be seen on the right. You can see that a new “Reset” button was added at the top of the Transform’s inspector, followed by the original fields that are part of the Transform component.
NOTE: The default inspector is a generic implementation and may not be the one you’re used to! For example, the Transform component has a built-in custom implementation inside UnityEditor.dll, that is implemented exactly as described above (deriving from Editor and decorating with the CustomEditor attribute). Unfortunately, if you want to override that inspector instead of the default one, you’ll have to resort to reflection to invoke that inspector’s methods.
Example Usage – Execute custom code when the inspector gets modified
In this example, whenever something in the inspector GUI changes, custom code will execute and print to the console that the object was modified:
using UnityEditor;
using UnityEngine;

[CustomEditor(typeof(MonoBehaviour), true)]
public class MonoBehaviourPropertiesEditor : Editor
{
public override void OnInspectorGUI()
{
// Draw the default inspector first.
DrawDefaultInspector();

if (GUI.changed)
{
OnModified();
}
}

private void OnModified()
{
Debug.Log("Inspector modified: " + target.name);
}
}
This is a rather contrived example, but this can have real valuable usages. In our project, for example, we have an inspector that lets you select a “mode” for the edited object. Once the mode is selected, a method is called (in the same way that is shown above) that changes the visual state of the object so it matches the new mode, making the changes available immediately in the scene view.
Summary
We’ve seen how to create a custom inspector for a custom class (inspectors are not only used to edit MonoBehaviours, they can edit any serializable asset, such as ScriptableObjects).
Stay tuned for the next parts of this series where i plan to talk about more advanced topics related to inspectors, such as serialization and Property drawers.
