The Unity editor allows adding custom menus that look and behave like the built-in menus. This can be very useful for adding commonly used functionality that is frequently needed to be accessible directly from the editor UI.
In this post i’ll show how new menu items in the Unity editor are created and try to provide real-world example usages to every described topic.
Adding Menu Items
In order to add a new menu to the top-level toolbar, you should create an editor script (a script file that is placed anywhere in the project under a folder named Editor). Menu items are created in script code as static methods that are marked with the MenuItem attribute.
For example, it’s common to add a new “Tools” menu (or a top-level menu with your company’s name) to provide options that are commonly used by your team/company.
Here’s an example of adding a new Tools menu with an option under it (clears all PlayerPrefs data):
using UnityEngine;
using UnityEditor;

public class MenuItems
{
    [MenuItem("Tools/Clear PlayerPrefs")]
    private static void NewMenuOption()
    {
        PlayerPrefs.DeleteAll();
    }
}
This creates a new editor menu called Tools, and places a menu item called Clear PlayerPrefs under it:
It’s also possible to create new menu items under an existing menu (e.g: under the Window menu), and also to create multiple levels of menus for better structuring and organization (recommended):
using UnityEngine;
using UnityEditor;

public class MenuItemsExample
{
    // Add a new menu item under an existing menu

    [MenuItem("Window/New Option")]
    private static void NewMenuOption()
    {
    }

    // Add a menu item with multiple levels of nesting

    [MenuItem("Window/SubMenu/Option")]
    private static void NewNestedOption()
    {
    }
}
This results in the following menu items:
Hotkeys
To allow power users and keyboard junkies to work faster, new menu items can be assigned with hotkeys – shortcut key combinations that will automatically launch them.
These are the supported keys (can also be combined together):
- % – CTRL on Windows / CMD on OSX
- # – Shift
- & – Alt
- LEFT/RIGHT/UP/DOWN – Arrow keys
- F1…F2 – F keys
- HOME, END, PGUP, PGDN
Character keys not part of a key-sequence are added by adding an underscore prefix to them (e.g: _g for shortcut key “G”).
Hotkey character combinations are added to the end of the menu item path, preceded by a space), as shown in the following examples:
// Add a new menu item with hotkey CTRL-SHIFT-A

[MenuItem("Tools/New Option %#a")]
private static void NewMenuOption()
{
}

// Add a new menu item with hotkey CTRL-G

[MenuItem("Tools/Item %g")]
private static void NewNestedOption()
{
}

// Add a new menu item with hotkey G
[MenuItem("Tools/Item2 _g")]
private static void NewOptionWithHotkey()
{
}
Menu items with hotkeys will display the key-combination that is used to launch them. For example, the code above results in this menu:
Note: There’s no validation for overlapping hotkeys ! defining multiple menu items with the same hotkey results in only 1 option being called by hitting the key combination.
Special Paths
As seen, the path passed to the MenuItem attribute controls under which top level menu the new item will be placed.
Unity has a few “special” paths that act as context menus (menus that are accessible using right-click):
- Assets – items will be available under the “Assets” menu, as well using right-click inside the project view.
- Assets/Create – items will be listed when clicking on the “Create” button in the project view (useful when adding new types that can be added to the project)
- CONTEXT/ComponentName – items will be available by right-clicking inside the inspector of the given component.
Here are some examples of how to use these special paths:
// Add a new menu item that is accessed by right-clicking on an asset in the project view

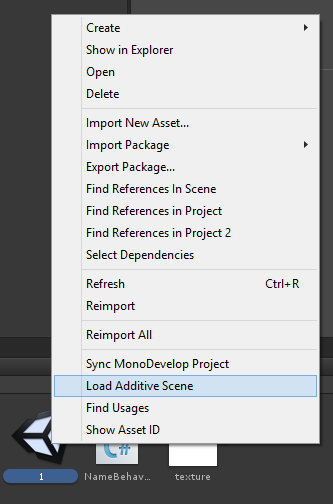
[MenuItem("Assets/Load Additive Scene")]
private static void LoadAdditiveScene()
{
    var selected = Selection.activeObject;
    EditorApplication.OpenSceneAdditive(AssetDatabase.GetAssetPath(selected));
}

// Adding a new menu item under Assets/Create

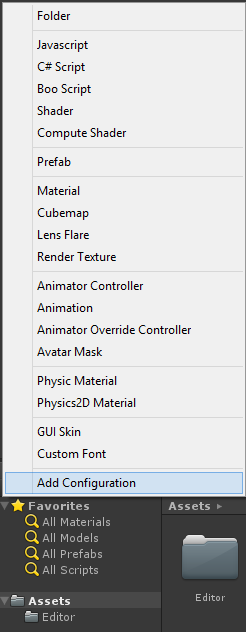
[MenuItem("Assets/Create/Add Configuration")]
private static void AddConfig()
{
    // Create and add a new ScriptableObject for storing configuration
}

// Add a new menu item that is accessed by right-clicking inside the RigidBody component

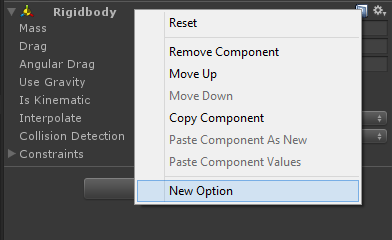
[MenuItem("CONTEXT/Rigidbody/New Option")]
private static void NewOpenForRigidBody()
{
}
The results for this code segment is these new menu options:
Validation
Some menu items only make sense in a given context, and should not be available otherwise. Enabling/disabling menu items according to their usage context is done by adding validation methods.
Validation methods are static methods, marked with the MenuItem attribute, passing true to the validation argument.
The validation method should have the same menu path as the menu it is validating, and should return a boolean value to determine whether the menu item is active or not.
For example, Validation methods can be used to add a right-click menu to Texture assets only under the project view:
[MenuItem("Assets/ProcessTexture")]
private static void DoSomethingWithTexture()
{
}

// Note that we pass the same path, and also pass "true" to the second argument.
[MenuItem("Assets/ProcessTexture", true)]
private static bool NewMenuOptionValidation()
{
    // This returns true when the selected object is a Texture2D (the menu item will be disabled otherwise).
    return Selection.activeObject.GetType() == typeof(Texture2D);
}
When right-clicking on anything that is not a texture in the project view, the menu item option will be disabled (greyed out):
Controlling Order with Priority
Priority is a number that can be assigned to a menu item (passed to the MenuItem attribute) that controls the ordering of menu items under the root menu.
Menu items are also automatically grouped according to their assigned priority in increments of 50:
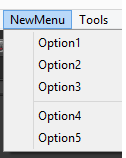
[MenuItem("NewMenu/Option1", false, 1)]
private static void NewMenuOption()
{
}

[MenuItem("NewMenu/Option2", false, 2)]
private static void NewMenuOption2()
{
}

[MenuItem("NewMenu/Option3", false, 3)]
private static void NewMenuOption3()
{
}

[MenuItem("NewMenu/Option4", false, 51)]
private static void NewMenuOption4()
{
}

[MenuItem("NewMenu/Option5", false, 52)]
private static void NewMenuOption5()
{
}
The code example results in the menu that has 2 groups of items, according to the assigned priority:
If it is required to add and organize menu items under existing Unity menus, a bit of “guess work” is needed, as most of the built-in menu items use priorities. Another option is to use a tool such as Reflector and look at the source code for internal Unity code (such as UnityEditor.CreateBuildInWindows) that is responsible for creating some of the menus in the editor.
Related Classes
Below is a listing of a few extra classes that are related to adding new menu items.
MenuCommand
When adding a new menu item to an inspector (using “CONTEXT/Component”, as described above), sometimes it is necessary to get a reference to the actual component (e.g: to modify its data).
This can be done by adding a MenuCommand argument to the static method that defines the new menu item:
[MenuItem("CONTEXT/RigidBody/New Option")]
private static void NewMenuOption(MenuCommand menuCommand)
{
    // The RigidBody component can be extracted from the menu command using the context field.
    var rigid = menuCommand.context as RigidBody;
}
As seen in the code example, when invoking the menu item, the component that serves as its context can be accessed using the context field.
ContextMenu
This attribute allows defining context menu items. This works exactly the same as defining a method with the MenuItem attribute with a path that starts with “CONTEXT/…”.
The difference is that with this attribute, you define the default context menu for a given component, whereas with the MenuItem approach, you “extend” other components’ menus (for example – the default components that are part of the engine).
Example – a component that exposes a context menu option to clear its data:
public class NameBehaviour : MonoBehaviour
{
    public string Name;

    [ContextMenu("Reset Name")]
    private static void ResetName()
    {
        Name = string.Empty;
    }
}
ContextMenuItem
This attribute is added to fields of a component (MonoBehaviour) class, to allow adding context menus at a finer resolution. While the ContextMenu attribute shown above adds context menus at the component level, marking fields with this attribute will add a right-click menu to individual public fields.
Since this attribute is added to a field and not a method, it accepts 2 arguments: the display name of the menu item and a name of a method (instance method) to be invoked when the menu item is selected.
Example – Adding a method to randomly initialize a component’s field to some state:
public class NameBehaviour : MonoBehaviour
{
	[ContextMenuItem("Randomize Name", "Randomize")]
	public string Name;

	private void Randomize()
	{
		Name = "Some Random Name";
	}
}
This code results in this context menu when right-clicking on the Name field of this component:
Wrap Up
As shown in this article, extending the Unity editor with custom menus can be pretty straightforward.
Building commonly used functionality and having it available from the editor is recommended for teams of all sizes and can be a huge time saver.
Links
- MenuItem
- ContextMenu
- ContextMenuItem
- Editor scripting from the real world (Unite 2014 session)


